How to Install the Latest TWRP and ROOT Smartphone Android
How to Install the Latest TWRP and ROOT Smartphone Android

TWRP (Team Win Recovery Project) is an open source software that makes it easy for smartphone android users to repair or install an open source OS. .
Read this before installing TWRP...
- Bootloader, unlocking root, installing custom ROM can void warranty;
- Warranty can be restored by flashing an official ROM;
- We recommend backing up your important data first in case the process fails and causes the smartphone android boot loop.
- Follow the instructions in this article carefully, one wrong step can cause your smartphone android to die completely.
- Do it at your own risk..!
- Installing Custom ROMs, Kernels, Plugins, GApps, Fix4G, SuperSU, Magisk and other mods;
- Backup/Restore Process of System, Boot, User Data, IMEI, Modem, Sensor Section, Cache, Dalvik Cache to Internal Memory;
- Can be used to transfer files via MTP, file manager and terminal emulator;
- As well as many other uses.
Well, due to the many advantages of TWRP, in this article I will look at how to install TWRP ROOT on all types of smartphone android .
Installing TWRP and ROOT smartphone android
Installing and rooting TWRP is divided into 3 steps, namely:
- Obtaining the appropriate TWRP file;
- TWRP file installation;
- rooted.
1. Get the appropriate TWRP file
To install TWRP, you need a TWRP image file (.img) according to your smartphone android type.How to get it:
1. Download the official TWRP app from the official website or Google Play Store;

Please note that this app is not intended to install TWRP, but to download the appropriate image file (.img) and install it later on your smartphone android .
2. After installation, launch the application, select I agree and then OK.

3. Then select TWRP FLASH and select Select Devices;

.. a list of available smartphone android is displayed;
4. Select devices according to the type of smartphone android or write in the Search devices column. For example, I'm looking for TWRP for Mi4C — libra;

5. Once you find it, download the latest TWRP file or version that matches the ROM you're currently using (if you're not sure, try searching for the appropriate version);
6. Next, the program directs the browser to download the TWRP file you selected earlier.
When you are done, the flash image file (.img) has been received on your Android device.
Also Read:
3 Ways to Update / Change TWRP to Latest Version
3 Ways solve TWRP Asking for Password / Internal 0MB Xiaomi [All Types]
Know TWRP: Features and Usage [Full Guide]
2. How to Installing TWRP Requirements before installing TWRP:
- Make sure your smartphone android battery is fully charged or at least 50% charged;
- Original or good quality USB cable to connect smartphone android to PC/Laptop;
- USB debugging and OEM unlocking enabled;
- Unlocked bootloader.
- Remember to backup important data first if smartphone android boot or TWRP asks for a password.
Materials needed:
- Install ADB-Fasboot-And-Driver-v1.4.3.zip, useful as a fastboot command;
- Install Android USB driver useful as ADB interface and bootloader interface drivers;
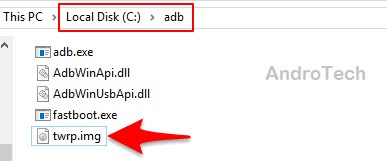
- Rename TWRP image file from official TWRP app to twrp.img;
Steps :
1. Connect smartphone android to PC/Laptop with good quality USB cable;
2. Place the renamed TWRP file twrp.img in c:/adb;
3. Press SHIFT button +Right-click when done, an empty area and then select Open command window here;

4. Make sure the device is connected (connected) by entering the command:
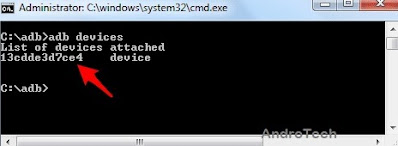
5. If a random code (serial number) is displayed, it means that the Smartphone Android is correctly connected to ADB status.
6. If it looks like this:
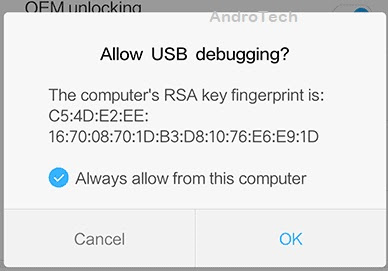
.. see SmartPhone Android screen, tap OK;
7. Then type:
8. The SmartPhone Android will automatically reboot and enter fastboot mode.
9. Make sure the connection is in fastboot mode by typing:
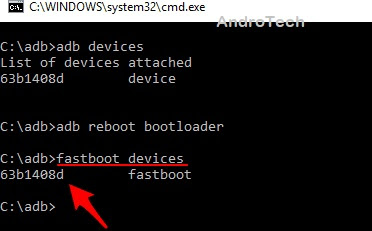
10. If a random code (serial number) is displayed, it means the device is connected correctly.
11. Next, type the command :
2. Place the renamed TWRP file twrp.img in c:/adb;

3. Press SHIFT button +Right-click when done, an empty area and then select Open command window here;

4. Make sure the device is connected (connected) by entering the command:
- adb devices

5. If a random code (serial number) is displayed, it means that the Smartphone Android is correctly connected to ADB status.
6. If it looks like this:

.. see SmartPhone Android screen, tap OK;
7. Then type:
- adb reboot bootloader
9. Make sure the connection is in fastboot mode by typing:
- fastboot devices

10. If a random code (serial number) is displayed, it means the device is connected correctly.
11. Next, type the command :
- fastboot flash recovery twrp.img

12. Wait until the process is complete and the tag is marked as Finished.
13. So far TWRP installation is complete.
After TWRP is installed, try to enter TWRP immediately by pressing the Power + Vol Up button for a few seconds until it enters TWRP as follows:

After logging in, select Mount and uncheck "Mount system partition in read-only mode" so that TWRP does not disappear after rebooting or installing a ROM.

Up to this stage, installation of TWRP recovery is complete.
3. Disable DM-Verity
Some newer versions of Android already have DM-Verity enabled. This means that if the recovery partition (TWRP installation) is modified, the device will not boot (bootloop) because this feature prevents it.
Therefore, use the material below to solve it:
Therefore, use the material below to solve it:
- Download no-verity-opt-encrypt-6.0.zip - 657 KB (to avoid startup loop, put it in internal memory without extracting it);
Steps :
1. In TWRP mode, copy the file no-verity-opt-encrypt-6.0.zip to internal storage;
2. and then select Install;

3. Then tap the no-verity-opt-encrypt-6.0.zip file you copied earlier;
4. Then "Swipe to Confirm Flash";
5. Wait until the installation is finished and "...done";
6. If so, select Reboot System.
Note!
In TWRP mode you can copy files to internal storage because TWRP already supports MTP (Media Transfer Protocol).
4. Step ROOT
Root is optional, it can be done or not according to needs. Read the pros and cons of a rooted mobile here.
Required materials :
Magisk-v16.0.zip – 5 MB | Here you can check the latest Magisk ingredients (install Magisk and root, don't unzip them and put them in internal storage);
Steps:
1. Re-enter TWRP, select Install;
2. Next, select the Magisk-v16.0.zip file you copied earlier;
3. Swipe right under "Swipe to Confirm Flash";

4. Wait for the process to be marked complete and then reboot the system.
After entering the home screen, the Magisk icon appears as follows.

This is the must-have app for rooted Smartphone android.
Reasons for TWRP installation failure
There are cases where TWRP installation fails, it can be due to several things, I will try to go through them one by one.1. Error: "Unable to load twrp.img"
Many people wonder why the error message "cannot load twrp.img" appears when installing TWRP.
This is because the adb program cannot find the executable file twrp.img.
Reason :
- Placed twrp.img in wrong directory; or
- Not renamed to twrp.img; or
- You accidentally renamed this file to twrp.img.img (this happens often).So it's easy, just replace the
So it's easy to just change the TWRP installation command to:
- fastboot flash recovery twrp.img.img
2. Flashing TWRP (Stay Stock Recovery)
failed. Some visitors to my blog say that after flashing TWRP until the process completes without errors, it turns out that TWRP is not installed and remains in stock recovery.If this happens, type fastboot again and repeat the flashing command as follows.
- fastboot flash recovery twrp.img
- fastboot boot twrp.img
3. TWRP asks for password
Whether it is a bug or actually TWRP protection, many latest Xiaomi versions experience this after installing TWRP. You can fix it by reading this article.After TWRP is installed, read the instructions in this article.
For more information, see the article Meaning of Error Messages When Installing TWRP Recovery.
That's How To Install TWRP and ROOT Smartphone Android [All Types].
Hope useful..!
Disclaimer :
Do this at your own risk.. ! I wrote the tutorial above after successfully testing it on several Smartphone Android I have. However, in different conditions and environments, the above method may not work on your device. So, if you want to follow the above method, you understand that you have to bear the risk of failure